Connect your MCP client
Add the Cyberday MCP server to your AI assistant. Choose your client below to get started.
Make sure the following are in place before connecting.
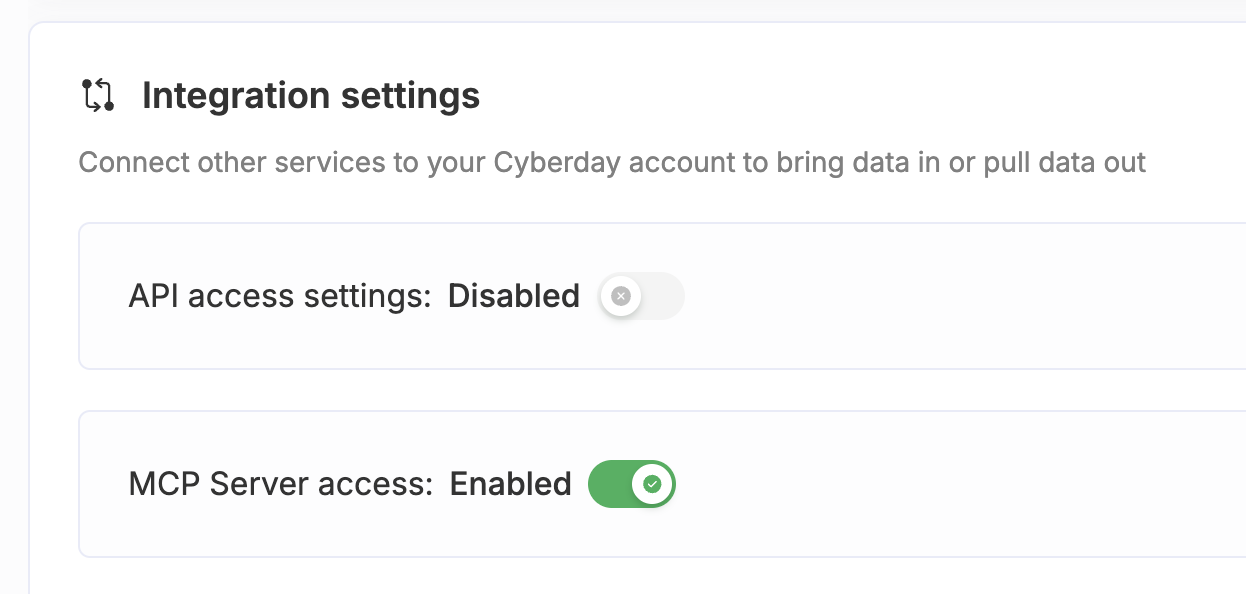
An admin must enable MCP access in your organisation's Cyberday settings before the server can be used.
Note: If you belong to multiple Cyberday accounts which have enabled MCP access, you must select which account to use in your user profile.
Only Cyberday admin accounts can authenticate with the MCP server.
If you normally access Cyberday through Microsoft Teams, you'll need a separate web login. Use your Microsoft account, or create a password at app.cyberday.ai/signup before connecting.
Connect your client
Follow the steps for your MCP client below.
- Claude Desktop
- ChatGPT
- Other clients
What you need
- Claude Desktop installed on your machine
- An active Cyberday admin account with MCP access enabled
How to connect
Claude Desktop supports MCP servers natively through its built-in connector settings. No manual config file editing needed.
- Open Settings and go to the Connectors tab
Click the Claude menu in the top-left corner of Claude Desktop, choose Settings, then select the Connectors tab (may also be labelled Integrations or MCP depending on your version).
- Add a connector and enter the server URL
Click the + button or Add custom connector. In the form that appears, paste the following URL into the server address field:
https://mcp.cyberday.ai/mcp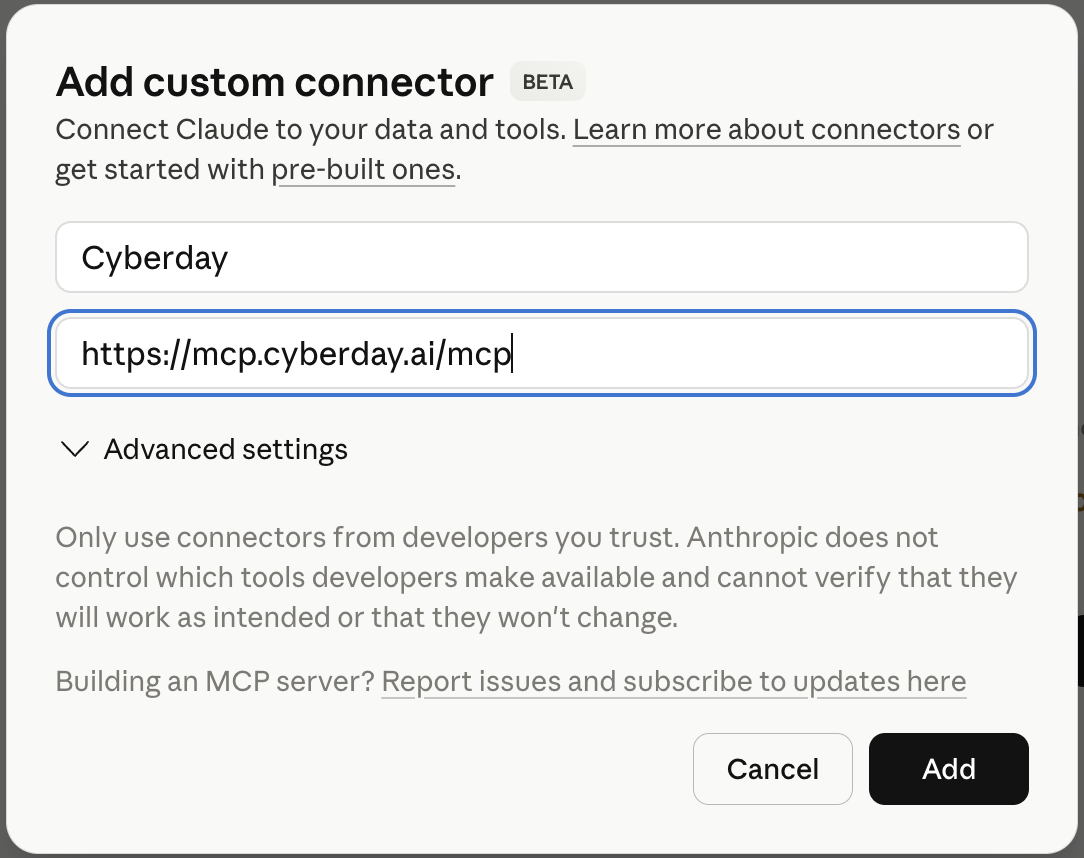
The connector form with the Cyberday MCP server URL filled in - Authenticate and start using Cyberday
Claude Desktop will open a browser window for you to log in to your Cyberday account. Once you've completed the login, the Cyberday tools will appear as available tools in Claude Desktop — you're ready to go.
Authentication is web-based. Cyberday uses your existing account login — no API keys or tokens to manage. Access can be revoked at any time from your Cyberday account settings.
What you need
- A ChatGPT Plus, Pro, Team, Business, or Enterprise plan (not available on free accounts)
- An active Cyberday admin account with MCP access enabled
How to connect
ChatGPT supports remote MCP servers through its Connectors feature in Developer Mode.
- Enable Developer Mode
Click your profile icon in the bottom-left corner of ChatGPT, go to Settings, go to the Apps section, then under the Advanced Settings find and enable Developer Mode (requires admin permissions). This unlocks the Connectors section.
- Create a new connector
In Advanced settings, open the Create App section. Give it a name (e.g. Cyberday), paste the server URL below, and set authentication to OAuth:
https://mcp.cyberday.ai/mcp - Authenticate and start using Cyberday
ChatGPT will redirect you to a browser login for your Cyberday account. Complete the OAuth flow to grant access. Once connected, enable the Cyberday connector in a conversation via the + menu and start prompting.
Authentication is web-based. Cyberday uses OAuth with your existing account — no API keys to manage. Access can be revoked at any time from your Cyberday account settings.
Any MCP-compatible client
Cyberday's MCP server follows the standard Model Context Protocol specification, so any compatible client can connect using the server URL below.
Server URL
https://mcp.cyberday.ai/mcp
Authentication is web-based. When you first connect, your client will open a browser window to complete login via your Cyberday account. No API keys required.
Compatible clients
- Cursor
- Windsurf
- VS Code (with MCP extension)
- Any client supporting the MCP spec
Refer to your client's documentation for the specific steps to add a remote MCP server.